Author: 0xca7
Introduction
For the last couple of years, I’ve been doing some security research on network equipment (routers, switches, etc.) for consumer, enterprise and industrial applications. I did this mostly out of curiosity and to get better at reverse engineering. I noticed that a lot of tutorials cover downloading firmware, unpacking it with binwalk and that’s it. There’s rarely any reverse engineering going on. That’s fine, you gotta started somewhere and it’s resources like this that get people started. But what about more “advanced” cases? What if the firmware is encrypted? (No, XOR ist not encryption). This is what I will cover in this blog post. My hope is I can fill a gap and inspire others to get (further) into reversing. Enough talk, let’s go.
Disclaimer
I left out all references to the manufacturer and the device model, I have no interest in being sued for whatever reason. Doesn’t matter what device it is, this blog post is about the journey and the reversing process.
Getting Started
Usually, I get started by looking for lists of manufacturers of network devices. From there, I pick something that stands out for me or choose totally at random. Then, I go the manufacturers website and download firmware. It was a day like any other when I downloaded the firmware image in question, among others. I quickly realized that only one image was encrypted, images for the others devices were not. I though this was strange and began to research a little. The device in question was relatively new on the market, so I guess the manufacturer changed some things up. Well, at this point I had two options. Option one was to drop it and choose one of the unencrypted images. Option two was to try to tackle the encrypted one. I went with the latter, seemed more fun. My reasoning was as follows:
- the router must contain some code that will decrypt the firmware that is thrown at it.
- on the router, the code is stored in a flash chip
- decrypting the encrypted firmware based on these assuptions is more interesting than working with non-encrypted firmware
Next, I looked up prices for the device, 35 euros in my case. As I had some spare money for toys, I ordered it. But before that, I did some recon.
Spoiler Alert: No, it’s not a hard-coded XOR key that “encrypts” the firmware.
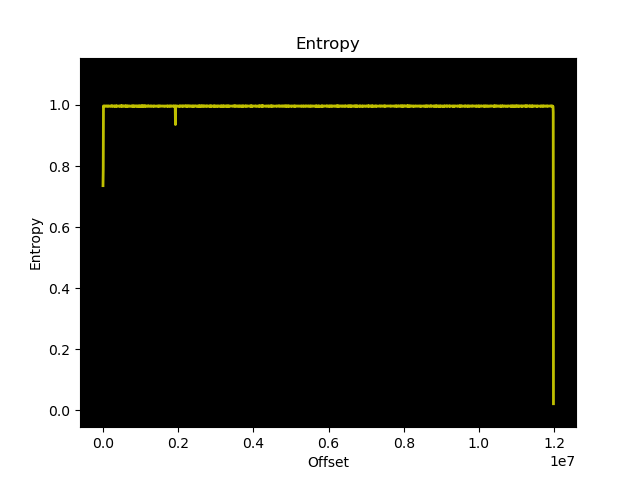
Looking at the entropy calculation of the encrypted firmware image, downloaded from the vendor’s website, you can see a high entropy which is not achievable with something “simple”.
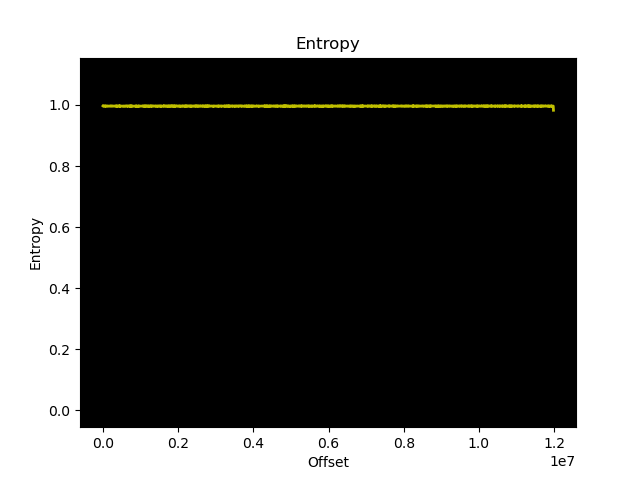
Note that this could also be compression (gzip, etc.), which also leads to a high entropy, but I didn’t see any headers for that in a hexdump. Just what seemed like random noise, indicating proper encryption.
Recon - FCC-ID
One thing you can do when you want a closer look into a device without actually buying and opening it is to check it out at fccid.io. For example, here you can find the entry for a netgear router https://fccid.io/PY322200568 - if you look into the exhibits there are some internal photos. That’s exactly what I did and from the internal photos, I was able to see that there is a flash chip in SOIC-8 format on the PCB. Because I have a SOIC-8 clip and the appropriate programmer, I was confident I could dump the flash.
Dumping the Flash
Soon, the device arrived and I was able to open the cover. A little surprise awaited me. The flash chip on the PCB was of the same format, but it was a different chip than the one on the FCC photos. That was a problem, the chip was an EN25QX128A - at the time, this wasn’t supported by flashrom [0], the program I wanted to use to connect to my programmer and subsequently dump the flash. Well, it turns out I was in luck. There’s an alternative: asprogrammer [1]. Only six days before the day I wanted to dump my flash, support for the EN25QX128A was added. Great, less work on my part. So, I started my Windows 10 VM, installed the software and dumped the flash. I took two dumps. The first one contained errors and was useless, the second one was good.
Side Note: I actually had to take the flash chip off of the PCB in order to be able to dump it. The reason was that once the programmer was attached and plugged into my laptop the router booted, performing a lock on the flash. Thus, to get rid of that, I removed it from the PCB using two soldering irons (I don’t have a hot air gun anymore or something similar, two soldering irons worked just fine - note to beginners: You don’t need to invest thousands of bucks in equipment - don’t believe the internet). This goes to show that dumping a flash might not be as simple as it looks in some tutorials.
Poking it with a Stick
To find out what I was up against, I ran binwalk [2] on the dump. This is what I got:
DECIMAL       HEXADECIMAL     DESCRIPTION
--------------------------------------------------------------------------------
35096         0x8918          CRC32 polynomial table, little endian
36192         0x8D60          gzip compressed data, maximum compression, from Unix, last modified: 1970-01-01 00:00:00 (null date)
16711684      0xFF0004        OpenSSL encryption, salted, salt: ...
The gzip’d part was the most interesting to me, also the salt stood out. Out of sheer laziness, I extracted everything with binwalk to get me the file 8D60, which is the compressed part between offsets 0x8D60 and 0xFF0004. That’s about 170kB in size, I extracted it. Having no idea what architecture the router is, I asked binwalk again with binwalk -A, applied to the extracted blob, which performs a best-guess regarding opcodes. This is what I got:
--- SNIP ---
97560         0x17D18         MIPSEL instructions, function epilogue
97828         0x17E24         MIPSEL instructions, function epilogue
98308         0x18004         MIPSEL instructions, function epilogue
98492         0x180BC         MIPSEL instructions, function epilogue
98824         0x18208         MIPSEL instructions, function epilogu
--- SNIP ---
Hate it or love it, seems to be MIPS little endian. Enter Ghidra.
Reverse Engineering with Ghidra
Finding the Base Address
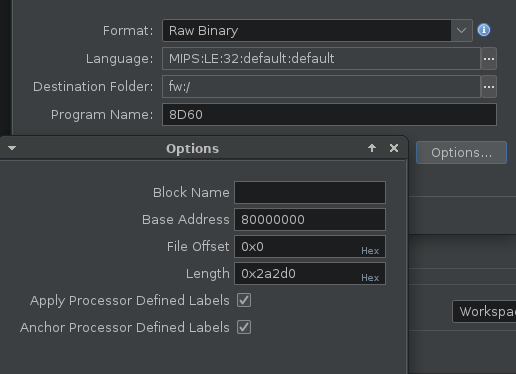
Alright, now for the fun part. I started by loading the binary file into Ghidra. As there are no ELF headers, it’s loaded as raw binary. I went with the language options MIPS:LE:32:default:default.
First order of business: find the base address of the image. Without the correct base address set, you won’t get proper cross-references. After auto-analysis, I started at the beginning of the binary and scrolled down in the flat assembly view until I hit some code. Here, I began looking for constant values. This caught my eye:
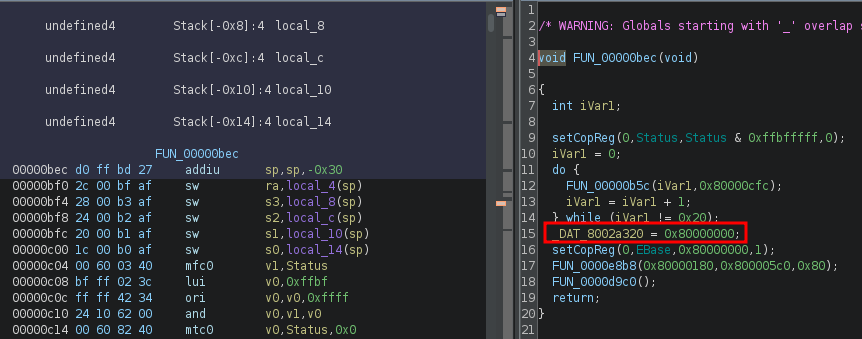
So, 0x80000000. Looks good. I imported the binary again, this time, I set the base address accordingly and let the auto-analysis run.
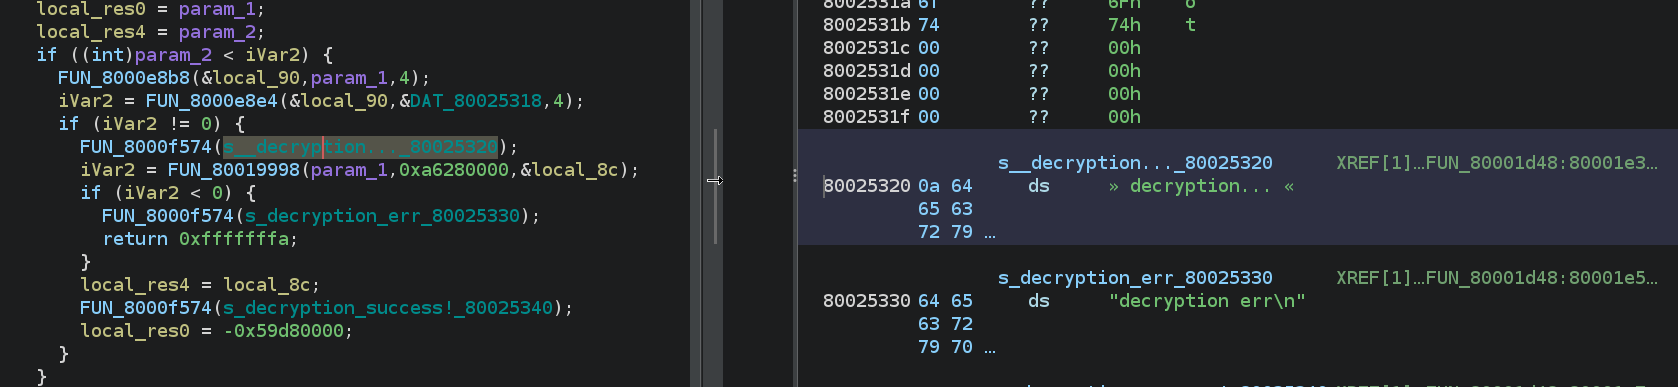
In order to confirm that I was right with the base address, I started to look for strings and checked if there were some cross references to them - indeed, there were. In particular there was one very interesting string:
 [Screenshot 0] Beginning of the Decryption Process
Some decryption process. But what does this actually decrypt? Looking into the cross-references to the function containing the strings starting with decryption shows that the routine is called after the mention of a TFTP Upload Client. As TFTP is often used to update firmware, it looks like this is indeed the decryption process for the firmware - let’s continue with that assumption.
Decrypting the Decryption Process
So… the firmware gets to the device somehow, here, via TFTP. The firmware is encrypted, it’s just a blob of data. It is decrypted, maybe it’s authenticity is checked, then it is installed. That means somewhere in this process there are at least two components interesting to us:
- the encryption algorithm that is used
- the encryption key
also, maybe:
- an IV used in the encryption process
- public key material
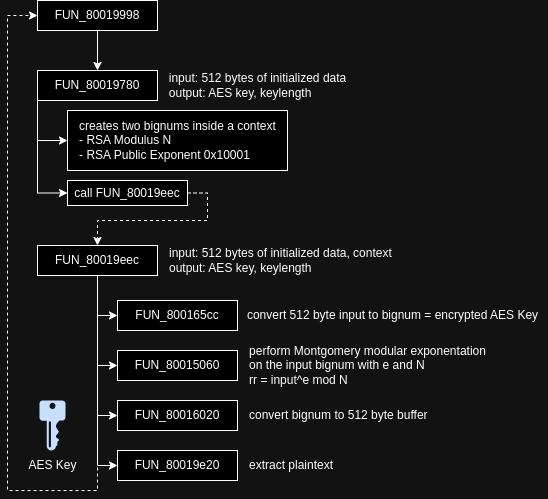
Looking at the last screenshot ([Screenshot 0]), you can see that FUN_8000f574 is clearly some kind of printing routine, probably via the UART interface. The function labled FUN_80019998 must be responsible for decryption, indicating success by returning a value $\geq 0$. Judging from the function parameters, the first will probably contain the encrypted data. The second could be the address to where the decrypted data is loaded to, the pointer to local_8c wasn’t of interest to me at this point. Let’s dig into FUN_80019998 next.
At the start of this function, there is another string to help us out:

[Screenshot 1] AES Key String
In the screenshot above, label (1) shows the string “aes key =” as a parameter to some function (pointer) at 0x80036f40, probably a debug print (2), activated by a global variable (DAT_800297d0) for debug builds. Following this is a loop, containing another print. The first parameter, DAT_80026890 points to the string "%c" - indicating that the AES key should be an ASCII string - that’s an important clue right there. The third label (3) shows us that the resulting AES key should be stored inside the buffer local_674 - indexed by uVar4 with a length of local_74 bytes. Both of these parameters are passed into the function labled FUN_80019780, marked in green at the top of the screenshot. It looks like the next function we want to analyse is FUN_80019780, which, judging from the screenshot, should produce the AES key.
Before we get into this function however, notice the arguments passed to it. First, DAT_800297e0 contains a high entropy section of 512 bytes - the same number passed in as the second paramter (0x200 == 512), then we have what we assume is the resulting AES key and key length. The first and second parameters seem to be data andlength as well. Let’s formulate some hypothesis of what could be happening here:
- we assume we get an AES key out, so it’s probably derived or encrypted.
- something with a length of 512 (bytes) goes into the function.
- the 512 bytes are 4096 bits, which might be indicative of RSA-4096
However, what stands against the RSA argument is that a private key would have to be used to decrypt. As a private key should never be shared with anyone, this doesn’t seem logical. Only one way to find out… into FUN_80019780 we go! Here it is, at least the first part, we will call this [F0]:
undefined4 FUN_80019780(undefined4 a_512buffer,undefined4 a_n512,int a_AES_KEY,int *a_KEYLEN)

{
   undefined4 *puVar1;
   undefined4 *puVar2;
   undefined4 uVar3;
   undefined4 *puVar4;
   int iVar5;
   int iVar6;
   undefined auStack_68 [8];
   undefined4 *local_60;
   undefined4 *local_5c;
   undefined4 local_40;
   undefined4 local_3c;
// SECTION 1 START
   puVar1 = (undefined4 *)FUN_80016570();  // <= [F1]
   puVar2 = (undefined4 *)FUN_80016570();
   uVar3 = FUN_8000e4e4(0x204);            // <= Allocation
   *puVar1 = uVar3;
   FUN_8000e8b8(uVar3,&DAT_80023b20,0x204); // <= [F2]
   puVar1[1] = 0x80;
   puVar1[2] = 0x81;
   puVar1[3] = 0;
   puVar1[4] = 1;
   puVar4 = (undefined4 *)FUN_8000e4e4(4);
   *puVar2 = puVar4;
   *puVar4 = 0x10001;                      // <= [F3]
   puVar2[1] = 1;
   puVar2[2] = 1;
   puVar2[3] = 0;
   puVar2[4] = 1;
// SECTION 1 END
   FUN_8000e894(auStack_68,0,0x40);
   local_40 = 1;
   local_3c = 6;
   local_60 = puVar1;
   local_5c = puVar2;
// SECTION 2 START
   iVar5 = FUN_80019eec(a_n512,a_512buffer,a_AES_KEY,auStack_68,1);
// SECTION 2 END
   uVar3 = 0xffffffff;
   if (0 < iVar5) {
      *a_KEYLEN = iVar5;
      if (((((DAT_800297d0 & 4) != 0) && (_DAT_80036f40 != (code *)0x0)) &&
            ((*_DAT_80036f40)(s_RSA_plaintext_len_=_%ld_80026da0,iVar5), (DAT_800297d0 & 4) != 0)) &&
           (_DAT_80036f40 != (code *)0x0)) {
         (*_DAT_80036f40)(s_RSA_plaintext:_80026dbc);
      }
-- SNIP --
Alright, it seems there is something going on with RSA, as the string RSA_plaintext catches the eye. But what about the rest? I’ve labled the functions and will go through them one-by-one.
[F1]
undefined4 * FUN_80016570(void)
{
   undefined4 *puVar1;

   puVar1 = (undefined4 *)FUN_8000e4e4(0x14);
   if (puVar1 == (undefined4 *)0x0) {
      FUN_8000f780("BN_F_BN_NEW,_ERR_R_MA_...");
   }
   else {
      puVar1[4] = 1;
      puVar1[1] = 0;
      puVar1[3] = 0;
      puVar1[2] = 0;
      *puVar1 = 0;
   }
   return puVar1;
}
This function contains a very important clue, another string: BN_F_BN_NEW,_ERR_R_M, does BN stand for BigNum? Would make sense if we assume that RSA is used here. A quick google leads us to openSSL 1.0.1c. The value BN_F_BN_NEW is contained there as a macro. Inside of FUN_8000e4e4 strings help us out again, with Allocation failed. What we have here is a function which seems to allocate 20 bytes and initialize the allocated memory.
Notice that in [F0], the allocated memory is used and it also calls the same allocation routine as in [F1], FUN_8000e4e4.
[F2]
This is just memcpy, copying whatever is at DAT_80023b20 into uVar3, which is pointed to by the memory allocated in [F1]. As it turns out, the data at DAT_80023b20 is initialized, looks random and has a size of 0x204 bytes.
[F3]
Here, we have 0x10001, which is usually used as a RSA public exponent $e$. Again, before this value shows up, something is allocated and values are set in the allocated memory. This leads me to draw the following conclusion.
SECTION 1
The routines in the area of section 1 in the code [F0] seem to allocate bignums and load values into them. A first bignum is created, 0x204 bytes are loaded into it, the bignum value, after that, a second bignum with the value 0x10001 is created.
SECTION 2
Now comes a part that’s a little trickier. If you follow the decompiled code, you can see that seemingly the bignums that were allocated aren’t used anywhere. The assembly however tells a different story, never trust the decompiler. To show you this, instead of going through the assembly, let’s look at the initialization part of [F0]:
undefined auStack_68 [8];   // <= this is passed to the function in SECTION 2
undefined4 *local_60;       // <= this is bignum0
undefined4 *local_5c;       // <= this is bignum1
Looks like local_60 and local_5c are seens as two independent values, while they are actually to be seen as part of auStack_68 and passed to FUN_80019eec in SECTION 2 via a pointer to auStack_68. Looking inside FUN_80019eec confirms this.
Enter Montgomery
Below is the function, called with the arguments iVar5 = FUN_80019eec(a_n512,a_512buffer,a_AES_KEY,auStack_68,1). So, we pass in the number 512, the 512 byte buffer, what we assume will be the decrypted AES key, the bignums as part of a buffer, most likely this is a struct and the number 1.
undefined4 FUN_80019eec(int param_1,undefined4 param_2,undefined4 param_3,int param_4,int param_5)
{
   int iVar1;
   int iVar2;
   uint **ppuVar3;
   int iVar4;
   int iVar5;
   undefined4 uVar6;
   undefined4 uVar7;
   int iVar8;

// SECTION 3 START
   iVar1 = FUN_80015e28(*(undefined4 *)(param_4 + 8));
   if ((0x4000 < iVar1) ||
       (iVar1 = FUN_80015cc0(*(undefined4 *)(param_4 + 8),*(undefined4 *)(param_4 + 0xc)), iVar1 < 1))
   {
      return 0xffffffff;
   }
   iVar1 = FUN_80015e28(*(undefined4 *)(param_4 + 8));
   if ((0xc00 < iVar1) && (iVar1 = FUN_80015e28(*(undefined4 *)(param_4 + 0xc)), 0x40 < iVar1)) {
      return 0xffffffff;
   }
// SECTION 3 END
   iVar1 = FUN_8001468c();
   if (iVar1 == 0) {
      return 0xfffffffe;
   }
   FUN_800146dc(iVar1);
   iVar2 = FUN_800147c8(iVar1);
   ppuVar3 = (uint **)FUN_800147c8(iVar1);
   iVar4 = FUN_80015e28(*(undefined4 *)(param_4 + 8));
   iVar8 = iVar4 + 7;
   if (iVar4 + 7 < 0) {
      iVar8 = iVar4 + 0xe;
   }
   iVar8 = iVar8 >> 3;
   iVar4 = uc_alloc(iVar8);
// SECTION 4 START
   if ((((((iVar2 != 0) && (ppuVar3 != (uint **)0x0)) && (iVar4 != 0)) &&
           ((param_1 <= iVar8 && (iVar5 = FUN_800165cc(param_2,param_1,iVar2), iVar5 != 0)))) &&
         ((iVar5 = FUN_80015cc0(iVar2,*(undefined4 *)(param_4 + 8)), iVar5 < 0 &&
           (((*(uint *)(param_4 + 0x2c) & 2) == 0 ||
            (iVar5 = FUN_80016ab4(param_4 + 0x30,0,*(undefined4 *)(param_4 + 8),iVar1), iVar5 != 0))))))
       && (iVar2 = FUN_80015060(ppuVar3,iVar2,*(undefined4 *)(param_4 + 0xc),
                                               *(undefined4 *)(param_4 + 8),iVar1,*(undefined4 *)(param_4 + 0x30)),
            iVar2 != 0)) {
// SECTION 4 END

// SECTION 5 START
      if ((param_5 != 5) || ((**ppuVar3 & 0xf) == 0xc)) {
         uVar6 = FUN_80016020(ppuVar3,iVar4);
         uVar7 = 0xfffffffe;
         if (param_5 == 1) {
            uVar7 = FUN_80019e20(param_3,iVar8,iVar4,uVar6,iVar8);
         }
// SECTION 5 END
         goto LAB_8001a0d4;
      }
--- SNIP ---
First order of business: Find out what is going on with the buffer/struct passed in as the fourth parameter. We know that the struct must look like this:
struct mystery {
    uint32_t unk0;          // offset 0x00
    uint32_t unk1;          // offset 0x04
    uint32_t bignum0;       // offset 0x08
    uint32_t bignum1;       // offset 0x0c
    ...
}
Look at SECTION 3, here, bignum0 is checked against some values. These are 16384 and 3072. Before, bignum0 was passed to FUN_80015e28. After some reversing around, which was tedious, I discovered that this must be a function that determines how many bits a number has. This also makes sense from the program flow and the checks. Thus, I labled this function uc_get_number_of_bits. It seems probable that, if RSA is used, bignum0 is the modulus $N$ - we will see if this is true. As for as bignum_1 is concerned, this must be the public exponent $e$ plainly because of it’s value 0x10001.
The next step is to determine where the bignums and the input, the 512 byte buffer assumed to be the encrypted AES key, are used. For this, after some reversing, I found out the following in SECTION 4:
First, FUN_800165cc converts the 512-byte input buffer to a bignum. Second, if we look inside of the function FUN_80015060, we see another string to help us out: BN_mod_exp_mont_cons. This is Montgomery modular exponentation in constant time. This functions is part of openSSL as well, but an internal function. If we look up the definition in the openSSL source code, we find the following definition:
int BN_mod_exp_mont_consttime(BIGNUM *rr, const BIGNUM *a, const BIGNUM *p,
    const BIGNUM *m, BN_CTX *ctx,
    BN_MONT_CTX *in_mont)
This tells us that the programmers of the firmware most likely took only the bignum part of openSSL and from there, exactly the functions they need without adding the full library.
Thus, the calculation performed in SECTION 4, function FUN_80015060 is:
$$ rr = a^e \mod N = (aes_key_{encrypted})^{0x10001} \mod N $$
In a last step, the key decryption is finalized in SECTION 5. First, the function FUN_80016020 is used to convert a bignum, the result $rr$, to a 512 byte buffer. In routine FUN_80019e20 the plaintext is extracted. I will explain what I mean by that shortly, but first, the full control flow and the cleaned up disassembly:
undefined4
uc_calc_aes_key(int a_RSASIZE,undefined4 a_RSAPUB,undefined4 a_?_AES_KEY,int a_struct_bn,int param_5)
{
  int v_ctx;
  int v_message;
  BIGNUM *rr;
  int v_rr_bytes;
  int var_ret;
  undefined4 uVar1;
  undefined4 v_plaintext_len;
  int v_bytes_to_alloc;

                    /* modulus m */
  v_ctx = uc_?_get_num_bits(*(BIGNUM **)(a_struct_bn + 8));
                    /* a_struct_bn + 0xc = e */
  if ((16384 < v_ctx) ||
     (v_ctx = uc_check_equal(*(undefined4 *)(a_struct_bn + 8),*(undefined4 *)(a_struct_bn + 0xc)),
     v_ctx < 1)) {
    return 0xffffffff;
  }
  v_ctx = uc_?_get_num_bits(*(BIGNUM **)(a_struct_bn + 8));
  if ((3072 < v_ctx) && (v_ctx = uc_?_get_num_bits(*(BIGNUM **)(a_struct_bn + 0xc)), 64 < v_ctx)) {
    return 0xffffffff;
  }
                    /* allocated and initialized to zero */
  v_ctx = uc_ctx_alloc_and_init();
  if (v_ctx == 0) {
    return 0xfffffffe;
  }
  openssl_bn_ctx_new(v_ctx);
  v_message = openssl_bn_ctx_init(v_ctx);
  rr = (BIGNUM *)openssl_bn_ctx_init(v_ctx);
  v_rr_bytes = uc_?_get_num_bits(*(BIGNUM **)(a_struct_bn + 8));
  v_bytes_to_alloc = v_rr_bytes + 7;
  if (v_rr_bytes + 7 < 0) {
    v_bytes_to_alloc = v_rr_bytes + 0xe;
  }
                    /* this is bits to bytes */
  v_bytes_to_alloc = v_bytes_to_alloc >> 3;
  v_rr_bytes = uc_alloc(v_bytes_to_alloc);
                    /* int BN_mod_exp_mont_consttime(BIGNUM *rr, const BIGNUM *a, const BIGNUM *p,
                                                     const BIGNUM *m, BN_CTX *ctx,
                                                     BN_MONT_CTX *in_mont);
                       p = 0x10001
                       m = modulus */
  if ((((((v_message != 0) && (rr != (BIGNUM *)0x0)) && (v_rr_bytes != 0)) &&
       ((a_RSASIZE <= v_bytes_to_alloc &&
        (var_ret = uc_lebin2bn(a_RSAPUB,a_RSASIZE,v_message), var_ret != 0)))) &&
      ((var_ret = uc_check_equal(v_message,*(undefined4 *)(a_struct_bn + 8)), var_ret < 0 &&
       (((*(uint *)(a_struct_bn + 44) & 2) == 0 ||
        (var_ret = uc_setup_mont_ctx(a_struct_bn + 0x30,0,*(undefined4 *)(a_struct_bn + 8),v_ctx),
        var_ret != 0)))))) &&
     (v_message = BN_mod_exp_mont_consttime
                            (rr,v_message,*(undefined4 *)(a_struct_bn + 0xc),
                             *(undefined4 *)(a_struct_bn + 8),v_ctx,
                             *(undefined4 *)(a_struct_bn + 0x30)), v_message != 0)) {
    if ((param_5 != 5) || ((*rr->d & 0xf) == 0xc)) {
                    /* returns a number of bits/bytes.
                       either way, a length value. */
      uVar1 = uc_copy_bn_to_buf(rr,v_rr_bytes);
      v_plaintext_len = 0xfffffffe;
      if (param_5 == 1) { // NOTE: param_5 is set to 1 by the caller
        v_plaintext_len =
             uc_extract_plaintext(a_?_AES_KEY,v_bytes_to_alloc,v_rr_bytes,uVar1,v_bytes_to_alloc);
      }
      goto LABEL_DONE;
    }
Plaintext Extraction
In the section before, I mentioned that FUN_80019e20 (relabled as uc_extract_plaintext) is significant. This function gets us the final plaintext AES key after decryption. The reason I want to highlight this function here, is because it aids with reverse engineering. Here’s the cleaned-up disassembly:
int uc_extract_plaintext(undefined4 a_result,int a_?_len0,char *a_rr,int v_bufsize,int a_?_len1)
{
  int i;
  char p_ch;
  char *vp_rr;
  char *vp_rr_current;
  int v_len;
  int ii;

  if ((v_bufsize + 1 == a_?_len1) && (vp_rr = a_rr + 1, *a_rr == 0x1)) { // <= [G0]
    v_len = v_bufsize + -1;
    i = 0;
    if (0 < v_len) {
      p_ch = *vp_rr;
      if (p_ch == -1) {
        ii = 1;
        do {
          vp_rr_current = vp_rr;
          i = ii;
          vp_rr = vp_rr_current + 1;
          if (v_len <= i) goto LABEL_DONE;
          p_ch = *vp_rr;
          ii = i + 1;
        } while (p_ch == -1);
        vp_rr = vp_rr_current + 2;
      }
      else {
        vp_rr = a_rr + 2;
      }
      if (p_ch != '\0') {
        return -1;
      }
    }
LABEL_DONE:
    if (((i != v_len) && (7 < i)) && (i = (v_bufsize + -2) - i, i <= a_?_len0)) {
      uc_memcpy(a_result,vp_rr,i);  // <= [G1]
      return i;
    }
  }
  return -1;
}
The result of the decryption is denoted as a_rr, notice label [G0]. The first byte, that is the most-significant byte of a_rr, must be equal to 0x01 for the plaintext to be successfully extracted by the memcopy at label [G1]. The rest is just skipping bytes. If you look at the loop above label [G1], you will see that all bytes equal to 0xff are skipped. Thus, a correctly decrypted key must look like this:
                     |-------- Plaintext -------|
0x01, 0xff .... 0xff, 0xde, 0xad .... 0xbe, 0xef
That is another clue we can use to our advantage. Besides that the function above also determines the plaintext’s length.
Further Key Derivation
Now we are back at the call to FUN_80019780 (relabled to uc_decode). Right at the beginning ([Screenshot 1]), here’s the cleaned up disassembly:
/* we decrypted the AES key with this routine */
v_AES_KEY = uc_decode(&g_ENCR_AES_KEY,0x200,v_?_aeskey,&v_len);
if (v_AES_KEY == 0) {
/* SECTION 6 START */
v_AES_KEY = uc_alloc(v_len + 1);
uc_memcpy(v_AES_KEY,v_?_aeskey,v_len);
/* SECTION 6 END */
*(undefined *)(v_AES_KEY + v_len + 1) = 0;
if (((g_DEBUG_ON & 1) != 0) && (_g_FPTR_PRINT_DEBUG != (code *)0x0)) {
    (*_g_FPTR_PRINT_DEBUG)(s_aes_key=_80026e14);
}
if (v_len != 0) {
    i = 0;
    do {
    if (((g_DEBUG_ON & 1) != 0) && (_g_FPTR_PRINT_DEBUG != (code *)0x0)) {
        (*_g_FPTR_PRINT_DEBUG)(&g_fmt_%c,v_?_aeskey[i]);
    }
    i = i + 1;
    } while (i < v_len);
}
if (((g_DEBUG_ON & 4) != 0) && (_g_FPTR_PRINT_DEBUG != (code *)0x0)) {
    (*_g_FPTR_PRINT_DEBUG)(s_Usage:_strap_bit_value_800269b8 + 0x18);
}
v_ret = uc_decode(a_img + 1,0x200,v_?_aeskey,&v_len);
if (v_ret == 0) {
    uc_calc_digest(a_img + 0x81,v_image_size - 0x200,v_hashval);
    v_ret = uc_strncmp(v_hashval,auStack_661,v_len - 0x13);
    if (v_ret == 0) {
    local_678 = 0;
    /* offset 0x204 into binary, this is "Salted__" */

    v_ret = uc_aes_cbc_decrypt(a_img + 0x81,v_image_size - 0x200,v_AES_KEY,0x40,0xa4000000, &local_678);

    if (v_ret == 0) {
/* omitted */
After the AES key is decrypted, it is copied to a separate buffer, v_AES_KEY (SECTION 6). This is then used below in the function uc_aes_cbc_decrypt. The rest of the functions are not important when it comes to decrypting the firmware, as such, I’ll skip these and we’ll dive into uc_aes_cbc_decrypt next, first the call:
v_ret = uc_aes_cbc_decrypt(a_img + 0x81,v_image_size - 0x200,v_AES_KEY,0x40,0xa4000000, &local_678);
Note that a_img is the encrypted firmware image blob, the image begins with metadata, 0x200 bytes in length, as such, this is subtracted. The AES key is passed in, together with the constant 0x40. I assume that 0xa4000000 is where the decrypted image will end up, however, we don’t care about that, same goes for local_678. There is one thing to note here regarding the first parameter a_img. The offset added, 0x81, is to be interpreted as a 32-bit offset. That means, 0x81 * 4 == 0x204 bytes are added to a_img. Inside uc_aes_cbc_decrypt, we see this offset of 0x204, again, the function was annotated by me:
undefined4
uc_aes_cbc_decrypt(int img_204,int param_2,undefined4 AES_KEY,undefined4 bytes_64,undefined4 a_addr?
                  ,int *param_6)
{
  int iVar1;
  undefined *v_ptr;
  uint uVar2;
  undefined4 *puVar3;
  undefined aes_key [16];
  undefined auStack_1f8 [48];
  undefined AES_KEY_FINAL [64];
  undefined AES_IV [16];
  undefined MD5_CTX [92];
  undefined4 AES_CTX [61];

  iVar1 = uc_strncmp(img_204,s_Salted___80026d54,8);    // <= [H0]

/* omitted */

    uc_md5_init(MD5_CTX);                               // <= [H1]
    uc_md5_update(MD5_CTX,AES_KEY,bytes_64);
    uc_md5_update(MD5_CTX,img_204 + 8,8);
    uc_md5_finalize(AES_KEY_FINAL,MD5_CTX);
    uc_memcpy(aes_key,AES_KEY_FINAL,0x10);
    uc_md5_init(MD5_CTX);
    uc_md5_update(MD5_CTX,AES_KEY_FINAL,0x10);
    uc_md5_update(MD5_CTX,AES_KEY,bytes_64);
    uc_md5_update(MD5_CTX,img_204 + 8,8);
    uc_md5_finalize(AES_KEY_FINAL,MD5_CTX);
    uc_memcpy(AES_IV,AES_KEY_FINAL,0x10);

/* omitted */

    uc_memset(AES_CTX,0,0xf4);
    iVar1 = uc_aes_init_key(aes_key,AES_CTX,0);         // <= [H2]
    if (iVar1 == 0) {
      if (((g_DEBUG_ON & 4) != 0) && (_g_FPTR_PRINT_DEBUG != (code *)0x0)) {
        (*_g_FPTR_PRINT_DEBUG)(s_gen_key:_80026d78);
      }
      puVar3 = AES_CTX;

/* omitted */

      if ((((g_DEBUG_ON & 4) != 0) &&
          ((_g_FPTR_PRINT_DEBUG == (code *)0x0 ||
           ((*_g_FPTR_PRINT_DEBUG)(s_Usage:_strap_bit_value_800269b8 + 0x18), (g_DEBUG_ON & 4) != 0)
           ))) && (_g_FPTR_PRINT_DEBUG != (code *)0x0)) {
        (*_g_FPTR_PRINT_DEBUG)(s_cbc128data:0x%x_80026d8c,*(undefined4 *)(img_204 + 0x10));
      }
      uc_?_cbc128_decrypt((undefined4 *)(img_204 + 0x10),a_addr?,param_2 + -0x10,AES_CTX,AES_IV); // <= [H3]
      *param_6 = param_2 + -0x10;
      return 0;
    }
  }

/* omitted */

}
I omitted some code here, because the disassembly looks horrible. Starting at label [H0], the image is checked for the string Salted__ at offset `0x204``, exactly 8 bytes in length. Here’s a hexdump of the image:
000001E0   F7 C7 80 CE  9C 70 D2 6C  AC 52 03 30  5A 18 48 95  .....p.l.R.0Z.H.
000001F0   5C 96 28 38  11 CF 89 7C  92 43 7E 87  29 48 47 A2  \.(8...|.C~.)HG.
00000200   19 FF 76 47  53 61 6C 74  65 64 5F 5F  xx xx xx xx  ..vGSalted__xxxx
00000210   xx xx xx xx                                         xxxx
Following Salted__ is the 8-byte salt value, omitted here, marked by “xx”. Next up is the sequence of operations starting at [H1]. Here, the MD5 hash algorithms is used to take the decrypted AES key and derive the actual key and an IV for AES. Looks like the vendor bamboozled us a little. I identified MD5 simply by looking into the function I labled as uc_md5_init:
void uc_md5_init(undefined4 *param_1)
{
  uc_memset(param_1,0,0x5c);
  *param_1 = 0x67452301;
  param_1[1] = 0xefcdab89;
  param_1[2] = 0x98badcfe;
  param_1[3] = 0x10325476;
  return;
}
From the constants used, it’s pretty clear that MD5 is used. As is usual, after a context for the hash algorithm is initialized, a “update” function adds data to the hash, which is finalized by “finalize” function. This is exactly what happens here. As you can see from the code, this is how the key and IV are derived:

The AES key decrypted by the Montgomery exponentiation is passed to MD5 along with the salt value from the firmware image, resulting in the derived AES key. MD5 is applied to this key, following the decrypted key and salt again. The final result is the IV for AES, derived AES IV. Note that only 0x40 bytes of the decrypted AES key are used with MD5, not the full key! I don’t know why this is, as the decrypted key is actually longer, but whatever…
Confirmation
Now the reversing part is done, time to test all of this. To get started, I extracted the following from the flash dump and the firmware image:
- $N$ the RSA modulus (dump)
- the encrypted AES key (dump)
- Salt value (downloaded firmware image)
Next, I re-implemented the decryption and key derivation procedure in C:
#include <stdio.h>
#include <stdlib.h>
#include <stdint.h>
#include <string.h>
#include <assert.h>

#include <openssl/bn.h>
#include <openssl/md5.h>

/* this is the modulus */
uint8_t g_MODULUS[0x200] = { ... };
/* public exponent */
uint32_t g_PUBEXP = 0x00010001;
/* taken from the flash dump this is the encrypted AES key */
uint8_t g_A[0x200] = { ... };

/* re-implementation of the function found in the flash dump */
static void *
extract_plaintext(uint8_t *p_buffer, int buflen, size_t *keylen)
{
    int i = 0;
    int ii = 0;
    char c = 0;
    char *p = &p_buffer[1];
    char *vp_rr = &p_buffer[1];
    char *vp_rr_current = NULL;
    void *p_key = NULL;

    /* always start at the second byte, the first byte is checked and must
     * be 0x01 in order for the routine to execute successfully */
    if(p_buffer[0] != 0x01)
    {
        printf("error extract_plaintext: first byte != 0x01\n");
        return;
    }

    if (*p == -1)
    {
        ii = 1;
        do
        {
            vp_rr_current = vp_rr;
            i = ii;
            vp_rr = vp_rr_current + 1;
            if (buflen <= i)
            {
                goto LABEL_EXTRACT_DONE;
            }
            *p = *vp_rr;
            ii = i + 1;
        }
        while (*p == -1);
        vp_rr = vp_rr_current + 2;
    }
    else
    {
        vp_rr = p_buffer + 2;
    }

    if (*p != '\0')
    {
        printf("extract_plaintext: error, *p != NULL\n");
        return NULL;
    }

    *keylen = buflen - 2 - i;

    p_key = malloc(*keylen);
    memcpy(p_key, vp_rr, *keylen);


LABEL_EXTRACT_DONE:
    return p_key;
}


int
main(int argc, char *argv[])
{
    int i = 0;
    int ret = -1;
    char *str = 0;
    size_t key_size = 0;
    void *p_key = NULL;

    BIGNUM *rr = BN_new();
    BIGNUM *a  = BN_new();
    BIGNUM *p  = BN_new();
    BIGNUM *m  = BN_new();
    BN_CTX *ctx = BN_CTX_new();

    uint8_t a_buf[0x200] = { 0x00 };

    size_t size = 0;
    void *data = read_file("firmware_image", &size);

    memcpy(a_buf, (uint8_t*)data+4, 0x200);

    /* calculate rr = a^p % m */

    /* encrypted key to bignum */
    BN_bin2bn(g_A, 0x200, a);
    str = BN_bn2hex(a);
    printf("a: %s\n", str);
    OPENSSL_free(str);

    /* modulus to bignum */
    BN_lebin2bn(g_MODULUS, 0x200, m);
    str = BN_bn2hex(m);
    printf("m: %s\n", str);
    OPENSSL_free(str);

    /* public exponent to bignum */
    const char *p_str = "10001\0";
    ret = BN_hex2bn(&p, p_str);
    printf("ret = %d\n", ret);
    str = BN_bn2hex(p);
    printf("p: %s\n", str);

    /*  BN_mod_exp is a wrapper and internally calls BN_mod_exp_mont_consttime
        int BN_mod_exp_mont_consttime(BIGNUM *rr, const BIGNUM *a, const BIGNUM *p,
                                const BIGNUM *m, BN_CTX *ctx,
                                BN_MONT_CTX *in_mont);
    */
    ret = BN_mod_exp(rr, a, p, m, ctx);
    printf("ret = %d\n", ret);
    assert(ret == 1);

    str = BN_bn2hex(rr);
    printf("rr: %s\n", str);

    uint8_t rr_buffer_be[0x200] = { 0x00 };
    /* bignum to buffer, rr_buffer_be contains the decrypted key */
    BN_bn2bin(rr, &rr_buffer_be[0]);

    uint8_t *rr_buffer = &rr_buffer_be[0];
    p_key = extract_plaintext(&rr_buffer_be[0], 0x200, &key_size);
    printf("DEBUG: extracted key of %d bytes\n", key_size);

    /* 2. take the salt from the firmware image, to produce md5 hash */
    char salt[8] = { 0x00 };
    memcpy(salt, ((uint8_t*)data)+0x204+8, 8);

    printf("SALT: \n");

    MD5_CTX md5 = {0};
    MD5_CTX *ctx_md5 = &md5;

    ret = MD5_Init(ctx_md5);
    if(!ret)
    {
        printf("MD5_init failed\n");
    }

    /* 3. perform key derivation */
    char aes_key[16] = { 0x00 };
    uint8_t *p_key_derive = (uint8_t*)p_key;
    MD5_Update(ctx_md5, (const void*)p_key_derive, 0x40);
    MD5_Update(ctx_md5, (const void*)&salt[0], 8);
    MD5_Final(&aes_key[0], ctx_md5);

    MD5_CTX ctx_iv = {0};
    char iv[16] = { 0x00 };
    ret = MD5_Init(&ctx_iv);
    MD5_Update(&ctx_iv, (const void*)&aes_key[0], 16);
    MD5_Update(&ctx_iv, (const void*)p_key_derive, 0x40);
    MD5_Update(&ctx_iv, (const void*)&salt[0], 8);
    MD5_Final(&iv[0], &ctx_iv);

    /* omitted: print keys */

    free(data);

    return 0;
}
This program spews out the key and IV. I used a simple python script with pycryptodome to implement AES-CBC-128 with the derived key and IV and let it loose on the downloaded firmware image. This is what I got:
DECIMAL       HEXADECIMAL     DESCRIPTION
--------------------------------------------------------------------------------
10840         0x2A58          LZMA compressed data, properties: 0x5D, dictionary size: 8388608 bytes, uncompressed size: 5681796 bytes
The entropy is very high still, as the data is compressed with LZMA:
After decompressing the LZMA part, this was the resulting entropy graph:
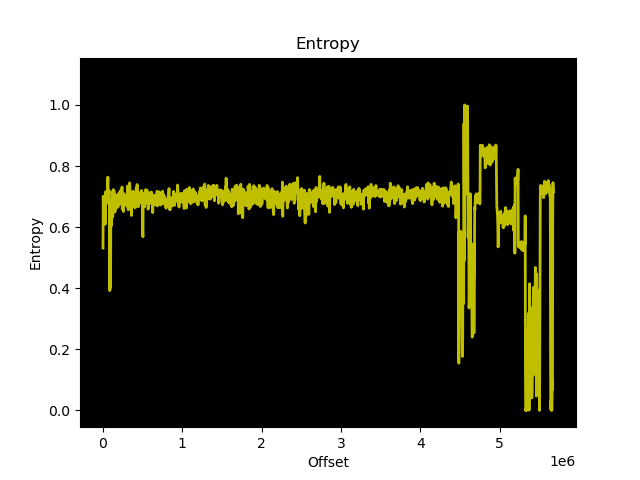
That looks very good. I went through the decrypted blob with a hex editor to discover distinct parts and patterns, I saw that there’s even an ELF header with code contained in the blob. After a little bit of carving and checking, I found lots of valid MIPS 32 LE code. I carved out distinct parts, the first parts with the MIPS32 LE instructions was imported into Ghidra, let’s see what we got!
Looks like the decryption worked, we got strings, and sane code which can be reversed next. Here’s a snippet:

Conclusion
With the firmware successfully decrypted, the next part of the journey begins. The main firmware blob is not an ELF binary, thus it is imported raw into Ghidra and as at the very start, the hunt for the image base address starts again. I hope this blog post gave an insight into the thought process and reverse engineering and decryptin of an encrypted firmware image. Of course, this approach and the way the encryption was done is not universal, but I hope you can take something from this. Lots of times, firmware binaries are only “encrypted” with XOR and “decryption” is trivial. Here, the decryption was more of a challenge. What aided us here was the debug information contained in the binary. That is not always the case, making things much harder to reverse engineer, but not impossible.
As far as reversing the decrypted firmware goes, I still have not started, but will do so in the future. Stay tuned. If you got this far, I wish you all the best, have a good day :^)
References
[1] asprogrammer https://github.com/nofeletru/UsbAsp-flash/releases
[2] binwalk https://github.com/ReFirmLabs/binwalk
[3] openSSL doxygen https://docs.huihoo.com/doxygen/openssl/1.0.1c/crypto_2bn_2bn_8h.html